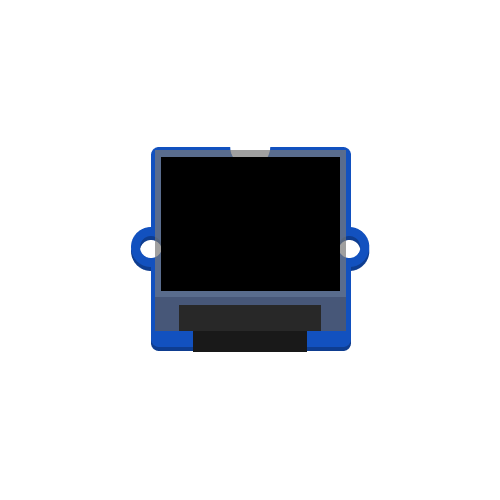
OLED Screen

A tiny (0.66”) monochrome OLED screen. Perfect for short text-based outputs and simple UI elements.
Background
The Grove 0.66” OLED module is based on the popular SSD1306 display controller. This chip drives a 1-bit (black & white) OLED panel with a resolution of 64×48 pixels, meaning each pixel is either on or off. The module communicates over I²C and by default uses the address 0x3C. Since the display has no built-in fonts or text features, all rendering is handled in software using CircuitPython’s displayio engine, which lets you draw text, shapes, or bitmaps to the screen.
Preparation
To use the Grove OLED in your code, the adafruit_displayio_ssd1306 and adafruit_display_text libraries are needed.
You can verify that the libraries are installed by ensuring a file called adafruit_displayio_ssd1306.mpy and a folder called adafruit_display_text are present in the /lib folder of your CIRCUITPY drive. If not, download Adafruit’s Library Bundle for Version 9.x here. Extract the needed files from the bundle and place them in the /lib folder on your microcontroller. You can learn more about libraries and their use in the Glossary or the Tutorials.
The examples below assume your module is connected to the Grove I²C header on GP9/GP8 (SCL/SDA). Alternatively, you can use the second I²C port on GP7/GP6.
Basic Usage
This example creates a simple text output consisting of two lines. Each line is defined as a label.Label object, which specifies the font (terminalio.FONT), the text (text="Hello,"), the color (color=0xFFFFFF), and the x/y position in pixels on the screen. Both labels are added to a group, which is then assigned to the display as its root_group. The root group represents the “scene” for the display: Only the objects inside it will be drawn.
In the main loop, the text of the second label is updated by changing its .text property. CircuitPython automatically redraws the label whenever its content changes, so the screen is refreshed without any extra commands.
# --- Imports
import time
import board
import busio
import displayio
import terminalio
from adafruit_display_text import label
import adafruit_displayio_ssd1306
from i2cdisplaybus import I2CDisplayBus


# --- Variables
line1 = label.Label(terminalio.FONT, text="Hello,", color=0xFFFFFF, x=2, y=8)
line2 = label.Label(terminalio.FONT, text="World!", color=0xFFFFFF, x=2, y=22)

# --- Functions


# --- Setup
displayio.release_displays()

i2c = busio.I2C(board.GP9, board.GP8)
display_bus = I2CDisplayBus(i2c, device_address=0x3C)
display = adafruit_displayio_ssd1306.SSD1306(display_bus, width=64, height=48)

group = displayio.Group()
group.append(line1)
group.append(line2)

display.root_group = group


# --- Main loop
while True:
    line2.text = "World!"
    time.sleep(0.5)
    line2.text = "World!_"
    time.sleep(0.5)
If you want to explore different fonts, you will also need to include the adafruit_bitmap_font library. This one is not included with your microcontroller and will need to be extracted from the Library Bundle for your CircuitPython version (9.x). See Adafruit’s displayio guide for details on working with fonts, bitmaps, and more advanced graphics.
Additional Resources
Adafruit’s displayio documentation
Comprehensive guide on working with displays in CircuitPython. The examples section features information on advanced text rendering and graphical UI elements.